# Hosting Node.js on Microsoft Azure
Got a fresh Node.js application to deploy? Awesome! Microsoft Azure has several options for hosting Node.js applications. In this article, we will be looking specifically at deploying to Windows Server websites and virtual machines.
## Azure website
An Azure website is an easy and straightforward way to deploy a Node.js application. From the Azure portal:
1. Click "**\+ New**"
2. Choose **Compute** > **Website** > **From Gallery**
3. Choose **Templates** > **Node JS Empty Site**
4. Enter a name for the site
Congratulations, you now have an Azure website configured for Node.js, ready for you to start uploading your files. Azure conveniently provides a URL to test your application, such as _myappname.azurewebsites.net_.
This option automatically creates `web.config` and `server.js` files. You can use FTP to download these files, make changes, and upload your application. Or, better yet, [set up automatic deployment](http://azure.microsoft.com/en-us/documentation/articles/web-sites-publish-source-control/) with GitHub, Bitbucket, Dropbox, or a number of other solutions.
> Note: If the entry point for your Node.js application is not `server.js`, such as `src/index.js`, be sure to update the `web.config` to point to the correct main file.
## Azure virtual machine using iisnode
An Azure Windows Server virtual machine (VM) is a good option if you are more comfortable with managing Windows Server, need to host more than one web application on the same VM (e.g. a mix of Node.js and ASP.NET applications), or have deployment requirements not supported by Azure websites. There are also a number of [benefits to using iisnode](https://github.com/tjanczuk/iisnode/wiki) when hosting a Node.js application on Windows Server.
### Requirements for Node.js and iisnode
* IIS
* [Node.js](https://nodejs.org/) (x64)
* [Microsoft Visual C++ 2010 Redistributable Package (x64)](http://www.microsoft.com/en-us/download/details.aspx?id=14632)
* [python 2.x](https://www.python.org/downloads/)
* [iisnode](https://github.com/tjanczuk/iisnode/releases) (x64)
* URL Rewrite module for IIS - use the [Microsoft Platform Installer](http://www.microsoft.com/web/downloads/platform.aspx) to install
> Note: Use the Windows Server **Add Roles and Features** Wizard to install IIS. C++ and Python are required to build certain Node.js modules (dependencies).
#### Pro Tip: Chocolatey
For managing applications on Windows machines, [Chocolatey](https://chocolatey.org/) is _the_ way to go. It can save you a lot of time setting up virtual machines, or the next time you decide to pave and reinstall your Windows development PC.
Unfortunately, not all the dependencies required for iisnode are available as Chocolately packages. However, you can save some time installing those that are.
* Install IIS
* [Install Chocolatey](https://chocolatey.org/)
* Run the following:
```bash
C:\> choco install python2
C:\> choco install vcredist2010
C:\> choco install nodejs.install
C:\> choco install urlrewrite
```
* Install [iisnode](https://github.com/tjanczuk/iisnode/releases) (x64)
### Steps to deploy Node.js to iisnode the first time
1. Create a new Azure VM, or manage an existing VM
2. Install the requirements on the Azure VM
3. Add a `web.config` file to your Node.js application
4. Copy your Node.js application to the VM
5. Delete the `node_modules`, if it exists
6. Run `npm install` to install application dependencies
7. Add any system environment variables
8. Add a new web site to IIS
#### Why do I need to run npm install?
Some Node modules include C code that must be compiled to match the current OS and architecture (x86 or x64). This makes it possible to develop a Node.js application on one OS (i.e. Mac OS X, Linux, or Windows) and deploy to another OS. Although it's possible to create builds for each target OS and architecture, many times the `node_modules` folder is not included in deployment. Rather, it is built on the target system using `npm install`.
#### Environment variables
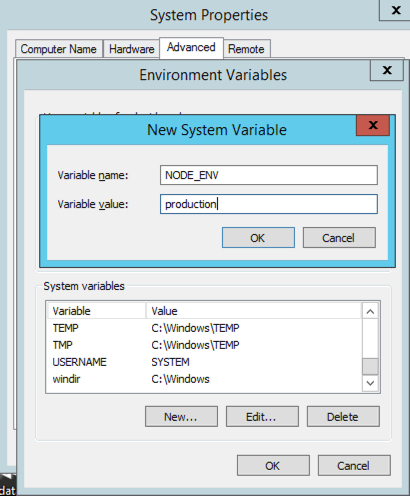
Some Node.js applications and frameworks require environment variables for proper configuration, such as production environment settings or database connection information. The key to remember here, these environment variables must be added as _system_ variables.
#### You're going to need that web.config
You will need to add a `web.config` file to your Node.js application to configure iisnode. The following is a sample file. Read the in-line comments carefully.
```xml
```
#### Add the website to IIS
1. Open up **Internet Information Services (IIS) Manager**
2. Expand the local server
3. Right-click **Sites**, and click **Add Website**
4. Fill out the form, and click **OK**
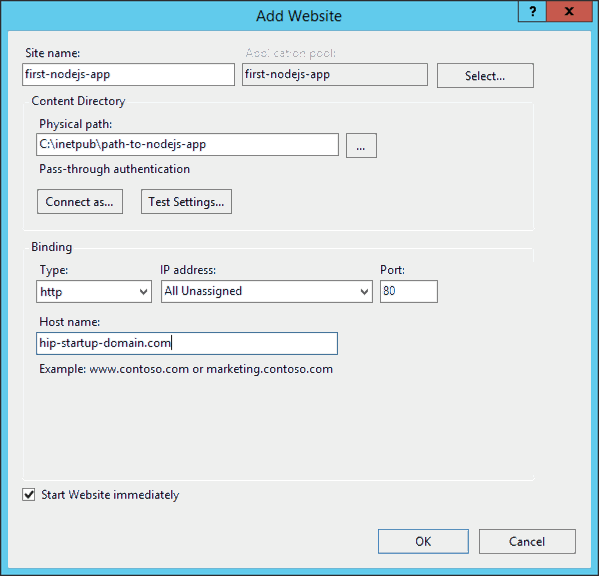
> Note: It is your responsibility to manage DNS records to point your application's domain (web address) to the **Public IP address** of the Azure VM.
Your Node.js application is now ready to roll!
### Redeploying your app to the VM
1. Copy your updated Node.js application to the VM
2. Delete the `node_modules`, if it exists
3. Run `npm install`
4. Overwrite or merge your old version with the new version
Similar to deploying an ASP.NET application, IIS will detect files have changed and restart the application.
## Deploy a Node.js application as a service on a Windows VM
This is a good option if you are more comfortable managing Windows Server, need to host one or more Node.js applications on the same VM, and do not need the complexity of installing IIS and iisnode. This is ideal for applications intended to run without a public-facing UI, such as Node.js application that acts upon messages published to a message queue.
### Requirements for Node.js applications
There are many options for running Node.js as a service, especially on Linux or Mac OS X. I have found [winser](http://jfromaniello.github.io/winser/) to work well on Windows.
* [Node.js](https://nodejs.org/) (x64)
* [Microsoft Visual C++ 2010 Redistributable Package (x64)](http://www.microsoft.com/en-us/download/details.aspx?id=14632)
* [python 2.x](https://www.python.org/downloads/)
* [winser](http://jfromaniello.github.io/winser/)
### Steps to deploy Node.js applications
1. Add `winser` as a dependency to your Node.js application
2. Install the requirements on the Azure VM ([see tip on Chocolatey](#pro-tip-chocolatey))
3. Add any system environment variables
4. Copy your Node.js application to the VM
5. Delete the `node_modules`, if it exists
6. Run `npm install`
7. Run `npm run-script install-service`
### Configuring winser
Winser must be installed as a dependency in your Node.js application and configured in `package.json`.
```bash
npm install --save winser
```
Next, edit `package.json` and add the following to your scripts, modifying to match your application's start file and name.
```json
"scripts": {
"start": "node index.js",
"install-service": "winser -i -s -a -n myapp-service-name",
"uninstall-service": "winser -r -x -s -n myapp-service-name"
},
```
> Note: Make sure `start` accurately reflects how your application is run.
### Work that Service
With winser correctly configured, installing is a breeze. Open a command prompt and enter the following.
```bash
C:\> cd \[path to node.js application]
C:\my-awesome-app> npm run-script install-service
```
If you look at **Server Manager** > **Tools** > **Services**, or use `net start`, you should see that your application is now running as a service. Like any other Windows service, you can stop and restart the application.
### Uninstall the service
Uninstall is just as easy. Our `uninstall-service` script in `package.json` is configured to automatically stop and remove the service.
```bash
C:\> cd \[path to node.js application]
C:\my-awesome-app> npm run-script uninstall-service
```
### Redeploying your service to the VM
1. Copy your updated Node.js application to the VM
2. Delete the `node_modules`, if it exists
3. Run `npm install`
4. Stop the service
5. Overwrite or merge your old version with the new version
6. Start the service