
Build a Secure Node.js Application with JavaScript Async Await Using Hapi

At the core of the JavaScript language is its asynchronous programming model. Unfortunately, dealing with callback functions has long been a source of frustration for many developers. JavaScript Promises helped make writing complex asynchronous code more manageable, but brought its own set of challenges. With the introduction of async functions in ES2017 (and the async and await keywords), writing asynchronous JavaScript is now much easier.
Hapi is one of many frameworks available for Node.js designed for building scalable web application and services. With the release of version 17, hapi has been completely overhauled to use JavaScript async functions. The result is a modern framework for Node.js that is a pleasure to use.
Most Node.js tutorials available today were written for older versions of Node.js using older ES5 syntax. In this tutorial, you will learn the basics of creating a Node.js web application with hapi using more modern JavaScript.
Create Your First hapi Web Server
Open up a terminal (Mac/Linux) or a command prompt (Windows) and type the following command:
node --version
If you get an error, or the version of Node.js you have is less than version 8, you'll need to install Node.js. On Mac or Linux, I recommend you first install nvm and use nvm to install Node.js. On Windows, I recommend you use Chocolatey.
After ensuring you have a recent version of Node.js installed, create a folder for your project.
mkdir learning-hapi
cd learning-hapi
A package.json file is required for your Node.js project and includes things like project information, scripts, and project dependencies. Use the npm command to create a package.json file in the project folder.
npm init -y
Next, install hapi as a dependency.
npm install hapi
Now open the project in your editor of choice.
If you don't already have a favorite code editor, I recommend installing Visual Studio Code. VS Code has exceptional support for JavaScript and Node.js, such as smart code completion and debugging. There's also a vast library of free extensions contributed by the community.
Next, create a folder named src. In this folder, add a new file named index.js. Open the file and add the following JavaScript.
"use strict";

const Hapi = require( "hapi" );

const port = 8080;
const server = Hapi.server( { port } );

// Define a route for the URL http://localhost:8080/
server.route( {
    method: "GET",
    path: "/",
    handler: () => {
        // a handler can return text, HTML, JSON,
        // a file, or just about anything
        return "My first hapi server!";
    }
} );

const start = async () => {
    try {
        // start the server
        await server.start();
        console.log( `Server running at http://localhost:${ port }` );
    } catch ( err ) {
        console.log( err );
        process.exit( 1 );
    }
};

start();
As you can see in the previous code, the line const start = async () => { declares an asynchronous function named start using the arrow function syntax. server.start() is itself an asynchronous function, which requires the await keyword. The await keyword instructs the application to pause execution until the async function completes before moving on to the next line of code.
Dealing with errors in asynchronous code before async/await was tricky at best. Another advantage of using async/await is the ability to use straight-forward try/catch blocks to catch any errors that may occur.
Next, edit the package.json file and change the "main" property value to "src/index.js". This property points Node to a file to execute when the application starts.
"main": "src/index.js",
Now you can start the application. Go back to the terminal window and type in the following command.
node .
You should see the message Server running at http://localhost:8080. Open your browser and navigate to http://localhost:8080. Your browser should display something like the following.
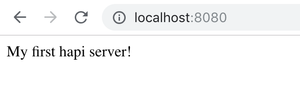
Success! You are on your way to hapi-ness!
Hapi Project Structure
As a Node.js project grows beyond a simple "hello world" example, it's essential to set up a good project structure. There are countless opinions on how you might organize a project, but a good starting point for a web application might look something like the following.
├── package.json
├── client
│   ├── index.html
│   ├── css
│   └── js
├── src
│   ├── app.js
│   ├── index.js
│   ├── plugins
│   │   └── index.js
│   ├── routes
│   │   └── index.js
│   └── views
└── test
    └── index.js
Hapi can serve static files, such as HTML, CSS, and front-end JavaScript, using the inert plugin (more on plugins later). The client folder is where you might store these static assets. Of course, the contents and structure inside the client folder may differ depending on your front-end framework of choice.
Under the src folder, you might organize your server-side code into the following files and folders:
app.jsto configure the hapi server,index.jsto start the server,pluginsfor registering external and custom hapi plugins,routesfor defining the resources, or URIs, of your application,- and
viewsfor any back-end dynamically-rendered content.
Hapi can render server-side content using the vision plugin combined with a template engine such as ejs, handlebars, or pug. It is up to you whether you want your application to serve static content using inert, server-rendered content using vision, or a mixture of both.
Note: If you are building an application that only acts as a service or only exposes an API, you may not have a need for the
inertandvisionplugins, or a need to have folders forclientandviews.
Refactor the Hapi Project
Before continuing further, refactor your project with the following steps.
Create a folder under src named plugins. Create a new file under src/plugins named index.js. Add the following code to this file.
"use strict";

module.exports.register = async server => {
    // more to come later
};
Create a new folder under src named routes. Create a new file under src/routes named index.js. Add the following code to this file.
"use strict";

module.exports.register = async server => {
    server.route( {
        method: "GET",
        path: "/",
        handler: () => {
            // a handler can return text, HTML, JSON,
            // a file, or just about anything
            return "My first hapi server!";
        }
    } );
};
Create a new file under src named app.js. Add the following code to this file.
"use strict";

const Hapi = require( "hapi" );
const plugins = require( "./plugins" );
const routes = require( "./routes" );

module.exports.createServer = async config => {
    const server = Hapi.server( config );
    // register plugins
    await plugins.register( server );

    // register routes
    await routes.register( server );

    return server;
};
Last, modify src/index.js to match the following code.
"use strict";

const app = require( "./app" );

const port = 8080;
const config = { port };

const start = async () => {
    try {
        // create the server
        const server = await app.createServer( config );

        // start the server
        await server.start();

        console.log( `Server running at  http://localhost:${ port }` );
    } catch ( err ) {
        console.log( err );
        process.exit( 1 );
    }
}

start();
Extend Hapi with Plugins and Libraries
By design, the core hapi service focuses on basic server functionality. Plugins add additional features and capabilities to hapi. Your application may use a mix of official plugins, third-party plugins, and custom plugins you write. Here are just a sample of the more commonly used plugins.
| Plugin | Description |
|---|---|
| inert | Use to serve static files and directories. |
| vision | Render templates. |
| blipp | Displays all the defined routes on startup. |
| hapi-pino | Fast application logger that logs information in JSON format. |
| bell | Third-party authentication. |
Here are a few useful libraries commonly found in hapi projects.
| Library | Description |
|---|---|
| joi | JSON object schema validation. |
| boom | Use to generate and return HTTP error messages. |
| bounce | Selectively catch and rethrow errors. |
| wreck | Collection of HTTP client utilities. |
| lab | Testing framework with code coverage analysis. |
| code | Test assertion library to use with lab. |
Install and Register hapi Plugins
In this next step, install two hapi plugins and configure them. From the command line, install blipp and hapi-pino.
npm install blipp hapi-pino
Next, modify src/plugins/index.js and replace the contents of this file with the following code.
"use strict";

const blipp = require( "blipp" );
const pino = require( "hapi-pino" );

const isDev = process.env.NODE_ENV !== "production";

module.exports.register = async server => {
    await server.register( [ blipp, {
        plugin: pino,
        options: {
            prettyPrint: isDev,
            logEvents: [ "response", "onPostStart" ]
        }
    } ] );
};
server.register() can take a single plugin or an array of plugins. A plugin can be registered using an instance of the plugin itself, such as the case with registering blipp. A plugin can also be registered using the plugin configuration object syntax, demonstrated by registering hapi-pino with its configuration options.
Create a Custom hapi Plugin
You can create your custom plugins for hapi to do all sorts of things, such as modify server configuration, add routes, or listen for server events. In this step, create a plugin that listens for when a server starts and logs a message.
Create a new file under src/plugins named serverStart.js. In this file, add the following code.
"use strict";

module.exports = {
    name: "serverStart",
    version: "1.0.0",
    register: async ( server, { message } ) => {
        server.events.on( "start", () => {
            const msg = message || `Server running at ${ server.info.uri }`;
            server.log( [ "info", "server" ], msg );
        } );
    }
};
A hapi plugin is a JavaScript object with a name property, a version property, and a register function with two arguments: server and options. Your serverStart plugin has an asynchronous register function that takes a server argument and uses object destructuring to take a message passed in the options. If the code does not specify a message, the plugin generates a default message.
To use this new plugin, modify src/plugins/index.js with the following code.
"use strict";

const Blipp = require( "blipp" );
const HapiPino = require( "hapi-pino" );
const serverStart = require( "./serverStart" );

const isDev = process.env.NODE_ENV !== "production";

module.exports.register = async server => {
    await server.register( [ Blipp, {
        plugin: HapiPino,
        options: {
            prettyPrint: isDev,
            logEvents: [ "response" ]
        }
    }, {
        plugin: serverStart,
        options: {
            message: `My hapi server is running at ${ server.info.uri }`
        }
    } ] );
};
Now run your application using:
node .
Your console output should look similar to the following.
method  path                          description
------  ----------------------------  -----------
GET     /

[1544478627595] INFO  (7408 on mycomputer):
    tags: [
      "info",
      "server"
    ]
    data: "My hapi server is running at http://mycomputer:8080"
Add Server Rendered Templates for a Better UI
So far the application has only returned plain text. A hapi application can respond to requests with text, static files, content dynamically generated from templates, or other types of media, such as JSON. In this step, add support for Embedded JavaScript templates, or EJS.
First, install the required dependencies using npm.
npm install vision ejs
Create a new file in the src/views folder named layout.ejs. Add the following HTML to this file.
<!DOCTYPE html>
<html>
<head>
    <meta charset="utf-8" />
    <meta http-equiv="X-UA-Compatible" content="IE=edge">
    <title><%= title %></title>
    <meta name="viewport" content="width=device-width, initial-scale=1">
    <link rel="stylesheet" href="https://cdnjs.cloudflare.com/ajax/libs/materialize/1.0.0/css/materialize.min.css">
    <link rel="stylesheet" href="https://fonts.googleapis.com/icon?family=Material+Icons">
</head>
<body>
    <%- content %>
</body>
</html>
Create a new file in the src/views folder named index.ejs. Add the following HTML to this file.
<div class="container">
    <h1 class="header"><%= title %></h1>
    <p><%= message %></p>
</div>
Next, update src/app.js to configure the vision plugin and ejs template engine.
"use strict";

const Hapi = require( "hapi" );
const vision = require( "vision" );
const ejs = require( "ejs" );
const plugins = require( "./plugins" );
const routes = require( "./routes" );

module.exports.createServer = async config => {
    const server = Hapi.server( config );

    // add the vision plugin and
    // register EJS template view support
    await server.register( vision );
    server.views( {
        engines: { ejs },
        relativeTo: __dirname,
        path: "views",
        layout: true
    } );

    // register plugins
    await plugins.register( server );

    // register routes
    await routes.register( server );

    return server;
};
Now, update src/routes/index.js to return the rendered view instead of text.
"use strict";

module.exports.register = async server => {
    server.route( {
        method: "GET",
        path: "/",
        handler: async ( request, h ) => {
            try {
                const message = "My first hapi server!";
                return h.view( "index", {
                    title: "Home",
                    message
                } );
            } catch ( err ) {
                server.log( [ "error", "home" ], err );
            }
        }
    } );
};
Note: In the previous
handlerfunction, therequestcontains information about the incoming request, andhis the response toolkit that includes properties and utilities for creating responses.
Secure Your hapi Server with Bell and Okta
Unless you are building a static website, chances are your application needs a way to allow visitors to register for an account, log in, reset their password, and so forth. Add to the mix the ever-changing landscape of security concerns, and you can easily see implementing and maintaining a sound security strategy is far from a trivial task.
The good news is Okta's developer platform, built on the latest open security standards, makes this step very easy.
To begin, create a free developer account with Okta at developer.okta.com. Click the Create Free Account button, or click the Sign Up button.

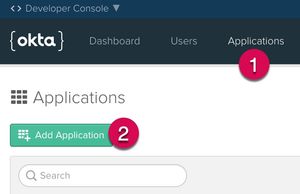
After creating your account, click the Applications link at the top, and then click Add Application.
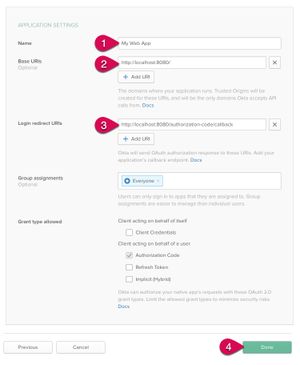
Next, choose a Web Application and click Next.

Enter a name for your application, such as My Hapi Server. Verify the port number is the same as configured for your local web application. Then, click Done to finish creating the application.
Enable self-service registration
One of the great features of Okta is allowing users of your application to sign up for an account. By default, this feature is disabled, but you can easily enable it. First, click on the Users menu and select Registration.

- Click on the Edit button.
- Change Self-service registration to Enabled.
- Click the Save button at the bottom of the form.

Manage Configuration with DotEnv
Node.js applications typically use environment variables for configuration. However, managing environment variables can be a chore. A popular module for managing application configuration data is dotenv.
Install dotenv as a project dependency.
npm install dotenv
Create a file named .env in the root folder of the project, and add the following configuration.
Note: When using a source control system such as
git, do not add the.envfile to source control. Each environment requires a custom.envfile. It is recommended you document the values expected in the.envfile in the project README or a separate.env.samplefile.
# Server configuration
NODE_ENV=production
PORT=8080
HOST_URL=http://localhost:8080
COOKIE_ENCRYPT_PWD=superAwesomePasswordStringThatIsAtLeast32CharactersLong!

# Okta configuration
OKTA_ORG_URL=https://{yourOktaDomain}
OKTA_CLIENT_ID={yourClientId}
OKTA_CLIENT_SECRET={yourClientSecret}
Now, update src/index.js to use the dotenv module.
"use strict";

// Load in environment configuration
require( "dotenv" ).config();
const app = require( "./app" );

const DEFAULT_PORT = 8080;
const port = process.env.PORT || DEFAULT_PORT;
const config = { port };

const start = async () => {
    try {
        // create the server
        const server = await app.createServer( config );

        // start the server
        await server.start();
    } catch ( err ) {
        console.log( err );
        process.exit( 1 );
    }
};

start();
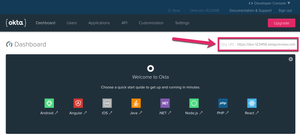
Go to your Okta account and click on the Dashboard link. On the right side of the page, you should find your Org URL. Copy and paste this value into your .env file to replace the value for OKTA_ORG_URL.
Click on the Applications link, and then click on the name of your new application. Click on the General tab, and find near the bottom of the page a section titled Client Credentials. Copy the Client ID and Client secret values and paste them into your .env file to replace {yourClientId} and {yourClientSecret}, respectively.

Create A Secure Web Application
First, install the bell and hapi-auth-cookie plugins. Bell is an authentication plugin, and hapi-auth-cookie is for cookie-based session management.
npm install bell hapi-auth-cookie
Under src/plugins create a new file named auth.js and add the following code.
"use strict";

const bell = require( "bell" );
const authCookie = require( "hapi-auth-cookie" );

const isSecure = process.env.NODE_ENV === "production";

module.exports.register = async server => {
    // register plugins
    await server.register( [ authCookie, bell ] );

    // configure cookie authorization strategy
    server.auth.strategy( "session", "cookie", {
        password: process.env.COOKIE_ENCRYPT_PWD,
        redirectTo: "/authorization-code/callback", // If there is no session, redirect here
        isSecure // Should be set to true (which is the default) in production
    } );

    // configure bell to use your Okta authorization server
    server.auth.strategy( "okta", "bell", {
        provider: "okta",
        config: { uri: process.env.OKTA_ORG_URL },
        password: process.env.COOKIE_ENCRYPT_PWD,
        isSecure,
        location: process.env.HOST_URL,
        clientId: process.env.OKTA_CLIENT_ID,
        clientSecret: process.env.OKTA_CLIENT_SECRET
    } );
};
Next, update src/plugins/index.js to register the new module.
"use strict";

const blipp = require( "blipp" );
const pino = require( "hapi-pino" );
const serverStart = require( "./serverStart" );
const auth = require( "./auth" );

const isDev = process.env.NODE_ENV !== "production";

module.exports.register = async server => {
    await server.register( [ blipp, {
        plugin: pino,
        options: {
            prettyPrint: isDev,
            logEvents: [ "response" ]
        }
    }, {
        plugin: serverStart,
        options: {
            message: `My hapi server is running at ${ server.info.uri }`
        }
    } ] );
    await auth.register( server );
};
Now, modify src/routes/index.js to the following code.
"use strict";

const boom = require( "boom" );

module.exports.register = async server => {
    server.route( {
        method: "GET",
        path: "/",
        config: {
            auth: {
                strategy: "session",
                mode: "optional"
            }
        },
        handler: async ( request, h ) => {
            try {
                const message = request.auth.isAuthenticated ? `Hello, ${ request.auth.credentials.profile.firstName }!` : "My first hapi server!";
                return h.view( "index", {
                    title: "Home",
                    message,
                    isAuthenticated: request.auth.isAuthenticated
                } );
            } catch ( err ) {
                server.log( [ "error", "home" ], err );
            }
        }
    } );

    server.route( {
        method: "GET",
        path: "/login",
        options: {
            auth: "session",
            handler: async request => {
                return `Hello, ${ request.auth.credentials.profile.email }!`;
            }
        }
    } );

    server.route( {
        method: "GET",
        path: "/authorization-code/callback",
        options: {
            auth: "okta",
            handler: ( request, h ) => {
                if ( !request.auth.isAuthenticated ) {
                    throw boom.unauthorized( `Authentication failed: ${ request.auth.error.message }` );
                }
                request.cookieAuth.set( request.auth.credentials );
                return h.redirect( "/" );
            }
        }
    } );

    server.route( {
        method: "GET",
        path: "/logout",
        options: {
            auth: {
                strategy: "session",
                mode: "try"
            },
            handler: ( request, h ) => {
                try {
                    if ( request.auth.isAuthenticated ) {
                        // clear the local session
                        request.cookieAuth.clear();
                    }

                    return h.redirect( "/" );
                } catch ( err ) {
                    request.log( [ "error", "logout" ], err );
                }
            }
        }
    } );
};
Create a new folder under src/views named partials. Create a new file in the partials folder named navigation.ejs. Add the following HTML to this file.
<nav>
    <div class="nav-wrapper">
    <% if ( isAuthenticated ) { %>
    <a href="/logout">Logout</a>
    <% } else { %>
    <a href="/login">Login</a>
    <% } %>
</nav>
Update src/views/layout.ejs to include the navigation.ejs file when it renders.
<!DOCTYPE html>
<html>
<head>
    <meta charset="utf-8" />
    <meta http-equiv="X-UA-Compatible" content="IE=edge">
    <title><%= title %></title>
    <meta name="viewport" content="width=device-width, initial-scale=1">
    <link rel="stylesheet" href="https://cdnjs.cloudflare.com/ajax/libs/materialize/1.0.0/css/materialize.min.css">
    <link rel="stylesheet" href="https://fonts.googleapis.com/icon?family=Material+Icons">
</head>
<body>
    <% include partials/navigation %>
    <%- content %>
</body>
</html>
Now, you are ready to start your application again.
node .
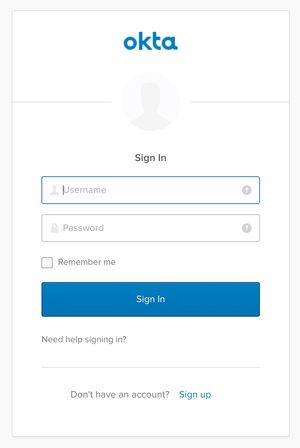
In your browser, navigate to http://localhost:8080/. Click on the Login button at the top. You should see a prompt to log in to your Okta account.
Note: To verify authentication is working as expected, you may need to open a new browser or use a private/incognito browser window.
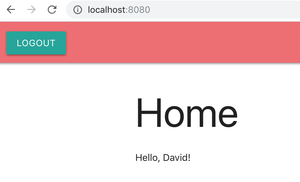
After logging in, you should be redirected back to the home page and see something like the following.
After authentication, the following profile information is available on every request as part of request.auth.
// request.auth (Example)
{
    "isAuthenticated": true,
    "credentials": {
        "provider": "okta",
        "token": "...",
        "expiresIn": 3600,
        "profile": {
            "id": "0012345",
            "username": "john.henry@company.com",
            "firstName": "John",
            "lastName": "Henry",
            "email": "john.henry@company.com",
            "raw": {
                "sub": "0012345",
                "name": "John Henry",
                "locale": "en-US",
                "email": "john.henry@company.com",
                "preferred_username": "john.henry@company.com",
                "given_name": "John",
                "family_name": "Henry",
                "zoneinfo": "America/Los_Angeles",
                "updated_at": 1544212558,
                "email_verified": true
            }
        }
    }
}
Add Tests to Your Hapi Project
A hapi project would not be complete without tests. Lab and code are the preferred test libraries for hapi projects. TestDouble is also a handy utility for replacing, mocking dependencies, and verifying behavior.
From the command line, install the following developer dependencies required for testing.
npm install --save-dev code lab testdouble
Create a new folder in the root of the project named test. Add a file to this folder named app.js. In this file, add the following code.
"use strict";

const td = require( "testdouble" );
td.replace( "hapi-pino" );
require( "dotenv" ).config();
const { expect } = require( "code" );
const Lab = require( "lab" );

const app = require( "../src/app" );

const lab = exports.lab = Lab.script();
const { describe, it } = lab;

describe( "App", () => {
    it( "home page returns valid response", async () => {
        const server = await app.createServer( { port: 12345 } );
        await server.initialize();
        const res = await server.inject( {
            url: "/",
            method: "GET"
        } );
        expect( res.statusCode ).to.equal( 200 );
        expect( res.result ).to.exist();
        expect( res.result ).to.contain( "My first hapi server!" );
    } );
} );
Modify your package.json file, and change the test scripts property to the following.
"test": "lab -c"
Now, run the test from the command line using the following command.
npm run test
The output from this first test should look similar to the following.
  .

1 tests complete
Test duration: 67 ms
No global variable leaks detected
Coverage: 88.73% (16/142)
src/plugins/serverStart.js missing coverage on line(s): 8, 9
src/routes/index.js missing coverage on line(s): 17, 24, 35, 46-50, 64, 65, 69, 75, 77, 78
One of the great features of lab is the ability to analyze your tests for code coverage. The code analysis report includes lines of your source code currently missing test coverage.
Go Get Hapi!
In this tutorial, you have learned the basics of creating a modern web application with hapi and some of the tools that are part of the hapi ecosystem. Below are more resources to explore.
- Add Authentication to Any Web Page in 10 Minutes
- Simple Node Authentication
- Use TypeScript to Build a Node API
- What the Heck is OAuth?
- Why You Should Consider hapi by Eran Hammer, principal creator of hapi
You can find the complete project source code on GitHub.
Thanks for reading, and happy... er... hapi coding!