
Meet SurrealDB: The Multi-Tool Database Your Node.js App Needs

I used to be a coffee snob. Pour-overs, artisanal beans, the whole ritual. Then I got a K-Cup machine. Is it the best coffee? No. Is it incredibly convenient and surprisingly useful? Absolutely. Now I can't imagine my mornings without it.
Sometimes, our tech stacks feel like juggling too many single-purpose tools. A relational database here, a document store there, maybe a graph database for connections, and sprinkle in a separate service for real-time updates. It works, but maybe there’s a simpler way?
Enter SurrealDB. Like that versatile coffee machine, it might just become the surprisingly powerful, convenient tool you didn't know you needed for your Node.js projects. It aims to be the ultimate multi-tool database, designed for the modern web.
What Makes SurrealDB Special?
SurrealDB isn't just another database; it's a different approach. Imagine the best parts of relational, document, and graph databases blended together, accessible via a familiar SQL-like language. Here's the brew:
- Multi-Model Magic: Need structured tables like PostgreSQL? Got it. Need flexible JSON documents like MongoDB? Yep. Store your data how it makes sense, even mixing models within the same database. Use
SCHEMAFULLfor strict schemas orSCHEMALESSfor flexibility. - Graph Connections Made Easy: Relationships aren't an afterthought. Define direct connections between records (Record Links) or use explicit
RELATEstatements for rich, traversable graphs. Querying connections feels natural, not like wrestling complex JOINs. - Built-In Auth & Permissions: Stop bolting on separate auth systems! SurrealDB handles user scopes, authentication (including JWT support), and fine-grained table/row-level permissions directly within the database. Define
SCOPEs andPERMISSIONSeasily. - Real-Time Ready: Need live updates pushed to your app? SurrealDB's
LIVE SELECTqueries over WebSockets let clients subscribe to data changes directly. Think Firebase real-time capabilities, but potentially simplifying your Node.js backend. - SurrealQL: A powerful, SQL-like query language that feels familiar but adds features for documents, graphs, time-series, geospatial data, and more. If you know SQL, you'll be productive quickly.
- Flexible Deployment: Run it locally via binary, spin it up easily with Docker, deploy it in your cloud, or use the SurrealDB Cloud managed service.
Get started with SurrealDB and Node.js
Ready to plug it into your Node.js app? Let's go!
By the way, you can get the source code for this tutorial!
Step 1: Install and run SurrealDB
If you have Docker, you can start a new instance of SurrealDB using the following command.
docker run --rm -p 8000:8000 surrealdb/surrealdb:latest start --user root --pass root memory
This starts an in-memory instance accessible at ws://localhost:8000 with user root and password root. Check the SurrealDB’s Run with Docker for more options (like file-based persistence).
If you prefer to install SurrealDB locally, you can start an in-memory instance using the following command.
surreal start --user root --pass root --bind 0.0.0.0:8000 memory
Step 2: Initialize a new Node.js project
mkdir surrealdb-app
cd surrealdb-app
npm init
Note: The sample code for this post is written using ES module syntax. You may need to verify that
"type": "module"is specified in yourpackage.jsonfor the code to work correctly.
Step 3: Install Node.js dependencies
To build your first SurrealDB Node.js web application, you’ll need to install the following dependencies.
| Dependency | Description |
|---|---|
surrealdb | The SurrealDB JavaScript SDK. |
@surreal/node | The SurrealDB Node.js client. |
dotenv | Allows you to use a .env file to manage configuration. |
Install these dependencies using npm.
npm install surrealdb @surrealdb/node dotenv
Step 4: Test your database connection using Node.js
Create a file named .env in the root of your project and add the following configuration.
# Fastify
PORT=8080

# SurrealDB
SURREAL_USER=root
SURREAL_PASS=root
SURREAL_URL=http://127.0.0.1:8000/rpc
SURREAL_DB=memory
SURREAL_NAMESPACE=testdb
SURREAL_DATABASE=testdb
Create a new folder named src. Create a new folder under src named data. Create a file at src/data/db.js and add the following code. This module will be used to create a connection to the SurrealDB database with the given connection information passed as a config object.
import Surreal from "surrealdb";

export async function getDatabase( config ) {
  const { url, namespace, database, username, password } = config;
  const options = { auth: { username, password } };
  const db = new Surreal();
  try {
    await db.connect( url, options );
    await db.use( { namespace, database } );
    return db;
  } catch ( err ) {
    console.error( "Failed to connect to SurrealDB:", err instanceof Error ? err.message : String( err ) );
    throw err;
  }
}
Create a new folder under src named config. Create a file at src/config/surreal.js and add the following code. This module will collect all of the SurrealDB connection information from environment variables.
const url = process.env.SURREAL_URL || "http://127.0.0.1:8000/rpc";
const namespace = process.env.SURREAL_NAMESPACE || "test";
const database = process.env.SURREAL_DATABASE || "test";
const username = process.env.SURREAL_USER;
const password = process.env.SURREAL_PASS;

const config = {
  url,
  namespace,
  database,
  username,
  password
};

export default config;
Create a new file at src/index.js and add the following code.
import "dotenv/config.js";

import config from "./config/surreal.js";
import { getDatabase } from "./data/db.js";

// Add sample coffee orders to the database
async function addCoffeeOrders( db ) {
  const orders = [
    {
      customerName: "Sarah",
      drink: "Oat Milk Latte",
      size: "medium",
      extras: [ "Extra Shot", "Sugar-Free Vanilla" ],
      price: 6.75,
      createdAt: new Date().toISOString(),
      status: "completed"
    },
    {
      customerName: "Marcus",
      drink: "Cold Brew",
      size: "large",
      extras: [ "Light Ice", "Sweet Cream" ],
      price: 5.95,
      createdAt: new Date().toISOString(),
      status: "in-progress"
    },
    {
      customerName: "Emma",
      drink: "Caramel Macchiato",
      size: "small",
      extras: [ "Whipped Cream", "Extra Caramel" ],
      price: 5.25,
      createdAt: new Date().toISOString(),
      status: "pending"
    },
    {
      customerName: "Liam",
      drink: "Espresso",
      size: "espresso",
      extras: [],
      price: 3.50,
      createdAt: new Date().toISOString(),
      status: "completed"
    }
  ];
  await db.insert( "order", orders );
}

async function main() {
  let db;
  try {
    // Connect to the database
    db = await getDatabase( config );
    if ( !db ) {
      console.error( "Could not connect to database!" );
      return;
    }

    // Insert sample coffee orders
    await addCoffeeOrders( db );

    // Query the coffee orders
    const orders = await db.query( `
    SELECT customerName, drink, size
    FROM order
    WHERE status = 'completed';` );

    console.log( orders );
  }
  catch( err ) {
    console.log( err );
  } finally {
    // Close the database connection
    if ( db ) {
      await db.close();
    }
  }
}

// Call the main function to start the script
main();
There are comments in the previous code to explain some of the details. In a nutshell, you’re validating that you can connect to the SurrealDB database, insert some data, and query the data that you just inserted. To see it in action, run the following command.
node src/index.js
You should see the following output in the console.
[
  [
    { customerName: 'Sarah', drink: 'Oat Milk Latte', size: 'medium' },
    { customerName: 'Liam', drink: 'Espresso', size: 'espresso' }
  ]
]
Congrats! You’ve just added and queried your first records with SurrealDB and Node.js!
Create an API using Fastify and SurrealDB
Now that we can store and retrieve data using Node.js and SurrealDB, let’s create a basic API to manage coffee orders using Fastify.
Step 1: Install Fastify dependencies
First, install these dependencies using npm.
npm install fastify fastify-plugin
| Dependency | Description |
|---|---|
fastify | The Fastify web server. |
fastify-plugin | Used to create your own Fastify plugins. |
Step 2: Configure Fastify plugins, routes, and server
Create a new folder under src named plugins and create a new file at src/plugins/surreal.js. Add the following code to the file.
import fp from "fastify-plugin";
import { getDatabase  } from "../data/db.js";

export default fp( async function ( fastify, opts ) {
  const db = await getDatabase( opts );
  fastify.decorate( "db", db );
} );
This Fastify plugin will connect to your SurrealDB server and make the database available to the rest of your backend code.
Next, create a new folder under src named routes and create a new file at src/routes/orders.js. Add the following code to the file.
import { RecordId } from "surrealdb";

export default async function coffeeApi( fastify, options ) {
  // Get all orders
  fastify.get( "/", async ( request, reply ) => {
    try {
      const orders = await fastify.db.select( "order" );
      return orders;
    } catch ( err ) {
      reply
        .code( 500 )
        .send( { error: "Failed to get orders", message: err.message } );
    }
  } );

  // Get order by ID
  fastify.get( "/:id", async ( request, reply ) => {
    try {
      // Use SurrealDB's RecordId to create an ID in correct format
      const orderId = new RecordId( "order", request.params.id );
      const order = await fastify.db.select( orderId );
      if ( order === undefined ) {
        return reply.code( 404 ).send( { message: "Order not found" } );
      }
      return order;
    } catch ( err ) {
      request.log.error( err );
      reply
        .code( 500 )
        .send( { error: "Failed to get order", message: err.message } );
    }
  } );

  // Create new order
  fastify.post( "/", async ( request, reply ) => {
    try {
      const { customerName, drink, size, extras, price } = request.body;
      const createdAt = new Date().toISOString();
      const updatedAt = createdAt;
      const status = "pending";
      const order = await fastify.db.insert( "order", { customerName, drink, size, extras, price, createdAt, updatedAt, status } );
      return order;
    } catch ( err ) {
      reply
        .code( 500 )
        .send( { error: "Failed to create order", message: err.message } );
    }
  } );

  // Update an order by ID
  fastify.put( "/:id", async ( request, reply ) => {
    try {
      const orderId = new RecordId( "order", request.params.id );
      const { customerName, drink, extras, price, size, status } = request.body;
      // Object destructuring to get only the supplied fields
      const orderUpdate = {
        ...( customerName !== undefined && { customerName } ),
        ...( drink !== undefined && { drink } ),
        ...( extras !== undefined && { extras } ),
        ...( price !== undefined && { price } ),
        ...( size !== undefined && { size } ),
        ...( status !== undefined && { status } ),
        updatedAt: new Date().toISOString()
      };
      // db.update() will replace the entire record with supplied data
      // db.merge() updates an existing record with the new data
      const order = await fastify.db.merge( orderId, orderUpdate );
      if ( order === undefined ) {
        return reply.code( 404 ).send( { message: "Order not found" } );
      }
      return order;
    } catch ( err ) {
      request.log.error( err );
      reply
        .code( 500 )
        .send( { error: "Failed to update order", message: err.message } );
    }
  } );

  // Delete an order by ID
  fastify.delete( "/:id", async ( request, reply ) => {
    try {
      const orderId = new RecordId( "order", request.params.id );
      const order = await fastify.db.delete( orderId );
      if ( order === undefined ) {
        return reply.code( 404 ).send( { message: "Order not found" } );
      }
      return reply.code( 204 ).send();
    } catch ( err ) {
      request.log.error( err );
      reply
        .code( 500 )
        .send( { error: "Failed to delete order", message: err.message } );
    }
  } );
}
Using a combination of path parameters and HTTP verbs, the orders.js module defines five routes for retrieving all orders, retrieving one order, creating, updating, and deleting coffee orders.
Note: These basic data operations are often referred to as CRUD, which stands for Create, Read, Update, and Delete.
Next, replace the code in src/index.js with the following code.
import "dotenv/config.js";
import Fastify from "fastify";

import surrealConfig from "./config/surreal.js";
import surreal from "./plugins/surreal.js";
import ordersApi from "./routes/orders.js";

const port = process.env.PORT || 3000;

// Create a Fastify instance
const fastify = Fastify( { logger: true } );

// Register plugins and routes
fastify.register( surreal, surrealConfig );
fastify.register( ordersApi, { prefix: "/api/order" } );

// Start the server
const start = async () => {
  try {
    await fastify.listen( { port } );
  } catch ( err ) {
    fastify.log.error( err );
  }
};
start();
Step 3: Launch and test the API
Open the package.json file in the root project folder, and replace the current "scripts" with the following.
  "scripts": {
    "dev": "node --watch-path=./src ./src/index.js"
  },
You can use this dev script to not only launch the web server, but it will also "watch" the src folder for any changes and automatically restart the server. This lets you make changes to your code without having to manually stop and restart the server.
With the SurrealDB server still running, go back to your terminal and use npm to run the dev script.
npm run dev
If all is configured correctly, you should now see a couple of log messages in the console with the text, "Server listening at http://127.0.0.1:8080".
Testing with curl
If you are on a computer running MacOS or Linux, or if you are using the Windows Subsystem for Linux (WSL), you can use the curl command to make API calls to your local web app. If you’re on Windows or you would rather use Postman, a great desktop app for making API calls, skip to Testing with Postman.
With SurrealDB and the Fastify web server running, open another terminal and enter the following command.
curl http://localhost:8080/api/order
You should see something like this returned.
[{"customerName":"Emma","drink":"Caramel Macchiato","extras":["Whipped Cream","Extra Caramel"],"id":"order:30lov24rg4mv5vaqz927","price":5.25,"size":"small","status":"pending","createdAt":"2025-04-07T19:45:00.109Z"},{"customerName":"Sarah","drink":"Oat Milk Latte","extras":["Extra Shot","Sugar-Free Vanilla"],"id":"order:5svylk1c5l50htafeakr","price":6.75,"size":"medium","status":"completed","createdAt":"2025-04-07T19:45:00.108Z"},{"customerName":"Liam","drink":"Espresso","extras":[],"id":"order:akczy5eulaymbjxpq1no","price":3.5,"size":"espresso","status":"completed","createdAt":"2025-04-07T19:45:00.109Z"},{"customerName":"Marcus","drink":"Cold Brew","extras":["Light Ice","Sweet Cream"],"id":"order:iigylb0a5d6tzwh02iok","price":5.95,"size":"large","status":"in-progress","createdAt":"2025-04-07T19:45:00.109Z"}]
You can format the JSON output using the following command.
curl http://localhost:8080/api/order | npx json
[
  {
    "customerName": "Emma",
    "drink": "Caramel Macchiato",
    "extras": [
      "Whipped Cream",
      "Extra Caramel"
    ],
    "id": "order:30lov24rg4mv5vaqz927",
    "price": 5.25,
    "size": "small",
    "status": "pending",
    "createdAt": "2025-04-07T19:45:00.109Z"
  },
  {
    "customerName": "Sarah",
    "drink": "Oat Milk Latte",
    "extras": [
      "Extra Shot",
      "Sugar-Free Vanilla"
    ],
    "id": "order:5svylk1c5l50htafeakr",
    "price": 6.75,
    "size": "medium",
    "status": "completed",
    "createdAt": "2025-04-07T19:45:00.108Z"
  },
  {
    "customerName": "Liam",
    "drink": "Espresso",
    "extras": [],
    "id": "order:akczy5eulaymbjxpq1no",
    "price": 3.5,
    "size": "espresso",
    "status": "completed",
    "createdAt": "2025-04-07T19:45:00.109Z"
  },
  {
    "customerName": "Marcus",
    "drink": "Cold Brew",
    "extras": [
      "Light Ice",
      "Sweet Cream"
    ],
    "id": "order:iigylb0a5d6tzwh02iok",
    "price": 5.95,
    "size": "large",
    "status": "in-progress",
    "createdAt": "2025-04-07T19:45:00.109Z"
  }
]
Create a new order using the following command.
curl http://localhost:8080/api/order \
--header 'Content-Type: application/json' \
--data '{
    "customerName": "Emily",
    "drink": "Oat Milk Latte",
    "size": "medium",
    "extras": [
        "Extra Shot",
        "Sugar-Free Vanilla"
    ],
    "price": 6.75
}' | npx json
You should see something like the following output.
[
  {
    "createdAt": "2025-04-07T20:49:31.004Z",
    "customerName": "Emily",
    "drink": "Oat Milk Latte",
    "extras": [
      "Extra Shot",
      "Sugar-Free Vanilla"
    ],
    "id": "order:lnfmdqzp6t5vupy15cp3",
    "price": 6.75,
    "size": "medium",
    "status": "pending",
    "updatedAt": "2025-04-07T20:49:31.004Z"
  }
]
In the previous example, you should find an id for the order in the format of "order:abc123". The value after order: is what you’ll use for the next commands. In the previous example, the id is "lnfmdqzp6t5vupy15cp3". Use the following command to retrieve the new order, replacing the [id] with your order id.
curl http://localhost:8080/api/order/[id] | npx json
{
  "createdAt": "2025-04-07T20:49:31.004Z",
  "customerName": "Emily",
  "drink": "Oat Milk Latte",
  "extras": [
    "Extra Shot",
    "Sugar-Free Vanilla"
  ],
  "id": "order:lnfmdqzp6t5vupy15cp3",
  "price": 6.75,
  "size": "medium",
  "status": "pending",
  "updatedAt": "2025-04-07T20:49:31.004Z"
}
Update the order to change the status from "pending" to "in-progress" (replace [id] with your order ID).
curl --request PUT http://localhost:8080/api/order/[id] \
--header 'Content-Type: application/json' \
--data '{
    "status": "in-progress"
}' | npx json
Delete the order using the following command (replace [id] with your order ID).
curl --request DELETE http://localhost:8080/api/order/[id]
Testing with Postman
Postman is a great desktop app for testing APIs. To retrieve all the orders, go to File -> New or click the + button to create a new HTTP request.
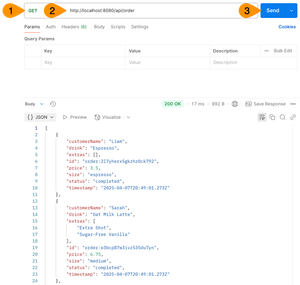
- Make sure a GET method is selected.
- Enter
http://localhost:8080/api/orderin the URL textbox. - Click Send.
Next, create a new order using Postman. Create a new request and follow these steps.
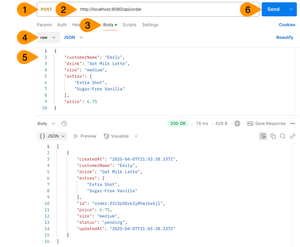
- Change the method to POST.
- Enter
http://localhost:8080/api/orderin the URL textbox. - Click on the Body tab.
- Choose raw.
- Enter the following JSON for the body.
- Click Send.
{
    "customerName": "Emily",
    "drink": "Oat Milk Latte",
    "size": "medium",
    "extras": [
        "Extra Shot",
        "Sugar-Free Vanilla"
    ],
    "price": 6.75
}
To retrieve the new order using its id, create a new request and complete the following steps.
- Make sure the method is set to GET.
- Enter
http://localhost:8080/api/order/:idin the URL textbox (the:idis a placeholder for the orderid). - Copy and paste the
id(the portion afterorder:) from the order you created into theidPath Variable value. - Click Send.

To update the status of an order, create a new request in Postman and complete the following steps.
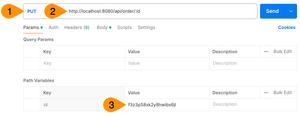

- Set the method to PUT.
- Enter
http://localhost:8080/api/order/:idin the URL textbox (the:idis a placeholder for the orderidvalue). - Copy and paste the
id(the portion afterorder:) from the order you created into theidPath Variable value. - Click on the Body tab.
- Add the following JSON to the body.
- Click Send.
{
    "status": "in-progress"
}
To delete an order, create a new request in Postman and complete the following steps.
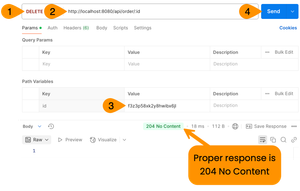
- Set the method to DELETE.
- Enter
http://localhost:8080/api/order/:idin the URL textbox (the:idis a placeholder for the orderidvalue). - Copy and paste the
id(the portion afterorder:) from the order you created into theidPath Variable value. - Click Send.
The Tech Stack Detox: When to Use SurrealDB in Node.js
So, should you drop everything and rewrite your app in SurrealDB? 🤷♂️ Maybe! Consider it when:
- Prototyping/MVPs: Get running fast. Its multi-model nature means less setup and configuration compared to juggling multiple specialized databases for your app.
- Real-Time Needs: Building chat apps, live dashboards, or collaborative tools?
LIVE SELECTcan significantly simplify your Node.js backend compared to managing WebSockets + Redis Pub/Sub + another DB. - Graph/Relational Hybrid: Your data has complex relationships (social networks, recommendations, knowledge graphs) but you also need flexible document storage. SurrealDB handles both elegantly.
- Simplifying Auth: For many apps, the built-in authentication and permissions might be sufficient, reducing the need for external auth services or complex middleware, especially during early stages.
It's not a silver bullet. For massive-scale analytics (think petabytes) or extreme low-latency financial transactions, specialized databases might still be the better fit. But for a huge range of web applications, SurrealDB offers a compelling, unified platform.
SurrealDB learning resources
Final Thoughts: Your New Favorite Brew?
SurrealDB offers a powerful and flexible alternative to traditional database setups for developers. By combining multiple models, graph capabilities, real-time features, and built-in auth under one roof with a familiar query language, it can genuinely simplify development and reduce architectural complexity.
It's like discovering that K-Cup machine – maybe not the only tool you'll ever use, but one that's so convenient and capable, you'll wonder how you managed without it.
Get the source code for this tutorial!
I hope you found this content useful! Give it a try and let me know how your first taste of SurrealDB goes!